
Ever pulled a tray from the oven expecting juicy chicken, only to find it dry and tasteless? That was my problem until I discovered a few tricks. Now, I can make delicious chicken breast every time.
This guide will teach you how to bake chicken breast perfectly. You’ll learn to pound the meat evenly and season it with salt, pepper, garlic powder, and paprika. Adding oil or butter helps with flavor and browning.
Using an instant-read thermometer and following specific timing ensures juicy chicken. You can bake at 400°F for 18–22 minutes or use 450°F for quicker cooking.
But it’s not just about baking. You’ll also learn how to season ahead, store safely, and reheat to keep it moist. This method is great for healthy meals like salads, sandwiches, and casseroles. It’s perfect for busy weeknights and batch cooking.
Table of Contents
Key Takeaways
- Even thickness and gentle pounding ensure uniform cooking and prevent dry edges.
- Simple seasonings and a bit of oil or melted butter boost flavor and browning.
- Use an instant-read thermometer to stop at the safe, juicy internal temp.
- Typical bake window: 18–22 minutes at 400°F for medium-thickness breasts; 450°F for quicker results.
- Make-ahead: season up to 24 hours; store cooked chicken 3–4 days or freeze up to 3 months.
Why this oven baked chicken breast method works for juicy results
This method ensures even cooking for a juicy chicken breast every time. It teaches you why even thickness and temperature control are key. These factors are more important than tricks that hide dryness.
How even cooking prevents dry, rubbery chicken
Pound or trim breasts to make them all the same thickness. This way, the center and edges cook evenly. Thin edges won’t overcook, and the middle will reach a safe temperature.
Keeping pieces the same size helps avoid rubbery meat. Even cooking means every bite has the same texture and flavor.
Role of temperature and cook time in moisture retention
Use moderate heat, around 400°F, for steady results. A typical bake lasts 18–22 minutes, depending on thickness. Higher heat, like 450°F, shortens the bake and locks in juices by reducing evaporation time.
Focus on internal temperature rather than time. Aim for 160–165°F. This ensures the chicken is safe to eat without guesswork.
Why resting matters: juice redistribution after baking
Let the chicken rest 5–10 minutes under foil after baking. Carryover cooking raises the internal temp slightly. This moves juices from the center to the edges.
Resting prevents a rush of fluids when you slice. It makes the meat firmer for cleaner cuts and a better mouthfeel. This keeps your oven baked chicken breast tender and moist.
| Step | Why it matters | Quick tip |
|---|---|---|
| Pound to even thickness | Equalizes cook time so edges don’t overcook | Use a meat mallet or rolling pin; aim for uniform ¾–1 inch |
| Choose oven temp | Balancing heat and time retains moisture | 400°F for steady baking; 450°F for faster sear and juice lock |
| Monitor internal temp | Thermometer prevents overcooking | Pull at 160–165°F; allow carryover to reach 165°F |
| Rest before slicing | Redistributes juices and firms meat | 5–10 minutes under foil for best results |
| Final check | Consistent thickness and temp make a juicy result | Practice yields the best way to bake chicken breast for repeatable success |
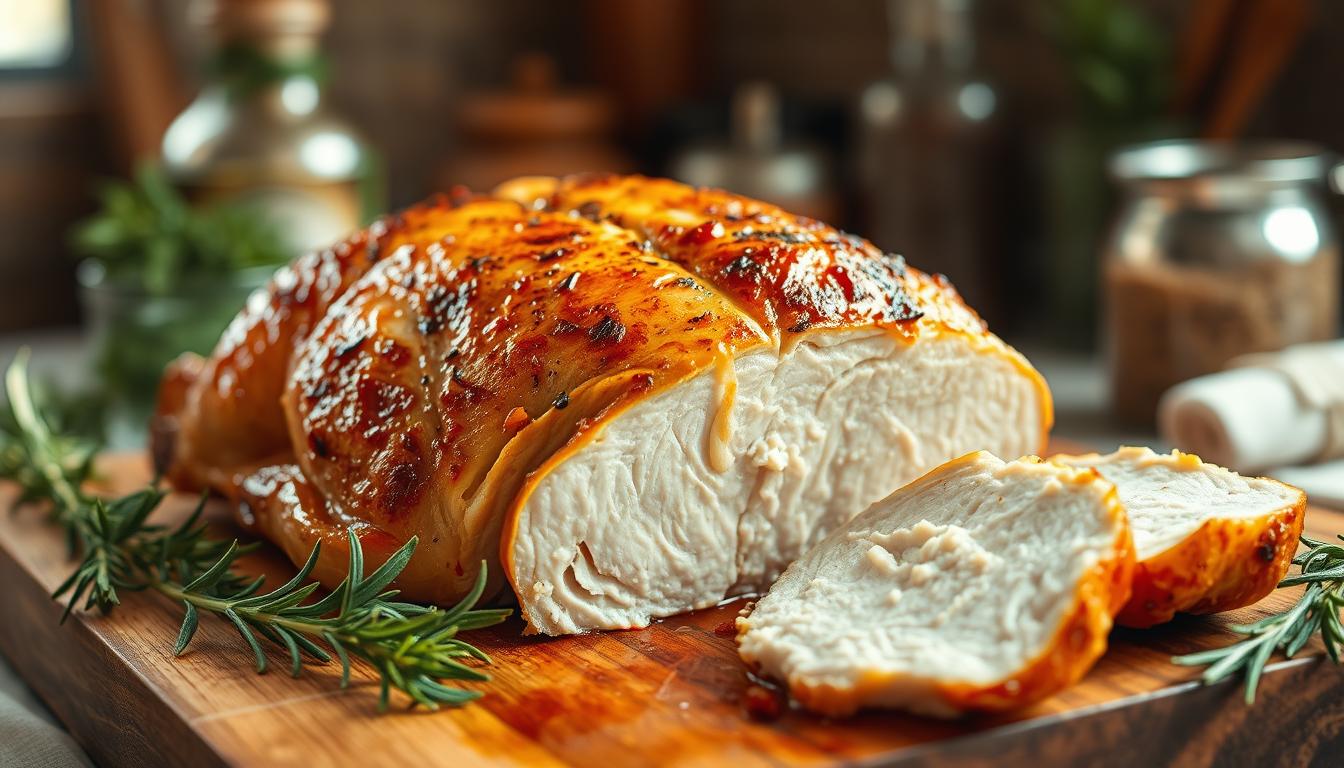
Baked Chicken Breast
When baking chicken at home, you want it to turn out right every time. Choosing the right cut and preparing it correctly ensures juicy meat. This guide helps you pick the best cuts, match thickness, and decide on brining. So, your Baked Chicken Breast will always be tender.
Choosing the right cut: boneless, skinless advantages
Start with boneless, skinless chicken breasts for easy results. They are lean, affordable, and easy to prepare. These breasts are perfect for quick meals and meal prep. They’re also great for seasoned or healthy baked chicken.
Importance of similar size and pounding to even thickness
Choose breasts that are similar in weight and shape for even cooking. If they’re not the same, the thicker parts will dry out before the thinner ones cook. Use a meat mallet or a heavy skillet to pound them until they’re even.
Pounding tenderizes the meat and makes it juicy. It’s a simple step that ensures a tender bite. Even thickness means your chicken cooks evenly, giving you reliable results.
When to brine and when pounding is enough
A quick brine can prevent dryness. Mix 1/4 cup of salt per quart of water and soak for 10 minutes at room temperature. Or, refrigerate for up to 24 hours for deeper flavor and moisture.
If you’re short on time, pounding and seasoning are enough. For many, even thickness and good seasoning make a flavorful chicken without brining. Brine when you plan ahead or want extra juiciness. Pounding is best when you’re in a hurry.
| Choice | When to use | Benefits |
|---|---|---|
| Boneless, skinless breasts | Everyday meals, salads, shredding | Lean, versatile, minimal trimming |
| Pounded to even thickness | Mixed sizes, quick cook times | Even cooking, tenderized texture |
| Quick brine (10 min to 24 hrs) | Thick cuts, make-ahead meals | Extra moisture, improved flavor |
Essential ingredients for a flavorful, healthy baked chicken breast
Begin with a basic seasoning mix for great taste. Use fine sea salt, black pepper, garlic powder, and paprika. This mix provides a solid foundation for flavor.
Simple pantry seasonings
For a simple recipe, mix your seasonings well. A light dusting of salt, pepper, garlic powder, and paprika adds color and depth. This way, each piece of chicken gets the right amount of flavor.
Oil or fat choices
Brush the chicken with olive oil for a healthy choice. It helps spices stick and promotes browning. Melted butter adds richer flavor and a deeper crust. Nonstick spray is good for cutting calories and easy cleanup.
Optional add-ins
Add extra flavors for a more complex dish. Italian seasoning adds herbal notes, while lemon zest brightens the taste. Chili powder or Cajun seasoning brings heat. Finish with a teriyaki glaze and fresh herbs like parsley or cilantro.
These ingredients help create a healthy baked chicken breast. It’s perfect for family dinners and meal prep. A well-seasoned chicken needs little else to impress, making it great for busy nights and pleasing picky eaters.
Prep steps for perfect oven baked chicken breast
Begin with a solid plan for consistent results. Preheat your oven to the right temperature for your recipe. The way you place the chicken and the surface you use greatly affect the juiciness of your oven baked chicken breast.
Preheating and rack placement
Set your oven to 400°F for a balanced roast or 450°F for a quicker bake. Place the rack in the middle for even air flow and browning. Use a rimmed baking sheet or a lightly greased 9×13 pan to catch juices without smoking.
Pounding, patting dry, and oiling
Place the breasts between plastic wrap and pound them evenly. This prevents the edges from drying out before the center cooks. Dry the meat with paper towels to help the seasoning stick and brown the surface.
Brush or spray all sides with olive oil or melted butter. This helps create a crust and adds flavor. Make sure to remove excess moisture before seasoning for a better sear.
How to season evenly
Mix your dry spices in a bowl and sprinkle them on both sides. Rub the blend into the meat for even coverage. For meal prep, oil and season the breasts, then refrigerate for up to 24 hours. Before baking, let them sit at room temperature for 15 minutes.
| Prep Step | Why it matters | Quick tip |
|---|---|---|
| Preheat oven & rack position | Ensures even heat and consistent browning for oven baked chicken breast | Use center rack; 400°F for steady cook, 450°F for quick baked chicken breast |
| Pound to even thickness | Prevents uneven cooking and dry edges | Cover with plastic wrap and use a meat mallet or rolling pin |
| Pat dry and oil | Promotes browning and helps seasonings stick | Wipe away surface moisture, then brush with olive oil or melted butter |
| Season and rub | Delivers consistent flavor across each breast | Combine spices in a bowl; rub both sides evenly; refrigerate up to 24 hours |
| Rest before baking | Brings meat closer to room temp for even cooking | Let sit 15 minutes after refrigeration for the best way to bake chicken breast |
Step-by-step baking instructions for juicy baked chicken breast
Start with room-temperature, patted-dry breasts and an even thickness. This small prep step helps you get consistent results. Whether you’re baking quickly or taking your time, it makes a difference.
Recommended oven temperature ranges and why
Use 400°F for even cooking on busy nights. It ensures the chicken stays moist and cooks well.
For faster cooking, choose 450°F. This high heat seals in juices, making your chicken breast quick and juicy.
Typical bake times and a thickness-based time chart
Measure the thickest part of the breast. Use the chart below to guide your baking time. Aim for an internal temperature of 160–165°F. Then, let it rest to reach 165°F.
| Thickness | Bake Time (at 400°F) | Bake Time (at 450°F) | Notes |
|---|---|---|---|
| 1/2 inch | 16–18 minutes | 12–14 minutes | Thin cuts cook quickly; watch closely to avoid overcooking. |
| 3/4 inch | 20–22 minutes | 16–18 minutes | Most home cuts fall here; reliable for an easy baked chicken breast recipe. |
| 1 inch | 24–26 minutes | 20–22 minutes | Thicker breasts need steady heat; rest for 5–10 minutes after baking. |
When and how to finish under the broiler for color
For a golden top, broil for 1–3 minutes at the end. Keep an eye on it to avoid burning.
For caramelized flavor, brush with BBQ or teriyaki sauce. Then, broil briefly. This adds a restaurant-style look while keeping the chicken moist.
Check with an instant-read thermometer to ensure doneness. Let the meat rest under foil for 5–10 minutes. This helps juices redistribute and keeps the texture perfect.
Temperature and tools: using a thermometer for foolproof results
For perfect results, you need a clear target temperature and the right thermometer. This guide will show you how to use a probe or instant-read tool. Your oven baked chicken breast will be safe and juicy every time.

Target internal temperature and carryover cooking
The USDA says chicken should be 165°F. Many cooks take it out at 160°F and let it rest for 5–10 minutes. This method ensures the meat is safe and stays moist.
Resting is key. It lets juices spread evenly. This step is crucial to avoid drying the chicken.
Instant-read vs probe thermometers: pros and cons
Instant-read thermometers are cheap and quick for checking temperatures. They’re good for a fast check before taking the chicken out.
Probe thermometers monitor the chicken’s temperature as it cooks. They alert you when it’s ready. This is great for busy nights and ensures consistent results.
Probes are more expensive and need to be placed correctly. Make sure not to touch bone or the pan. Instant-read thermometers require practice to get accurate readings without overchecking.
How to test doneness without cutting into the chicken
Put the thermometer into the thickest part of the breast, aiming for the center. Look for a firm texture and clear juices after resting. Don’t slice before resting to keep the chicken moist.
These tips will help you make the best oven baked chicken breast. You’ll get juicy chicken for dinners and meal prep.
Seasoning variations and flavor ideas for easy baked chicken breast
Think of the chicken as a blank canvas. A simple oven baked chicken breast needs a light oil coat and a sprinkle of salt and pepper. Then, you can add more distinct flavors.
Choose a flavor that matches your meal plan. For sandwiches and bowls, go for robust, smoky flavors. For salads and pasta, choose brighter, herb-forward mixes. For global dishes, use bold spices or a glossy glaze.
BBQ and smoky rubs:
Mix smoked paprika with brown sugar, garlic powder, onion powder, and a pinch of cayenne. Rub it on the chicken and bake until almost done. Then, baste with your favorite barbecue sauce and broil briefly for a caramelized crust. This makes the chicken perfect for sandwiches or grain bowls.
Lemon-pepper and Italian herb blends:
For a bright finish, mix lemon zest, black pepper, and sea salt. For an Italian twist, use oregano, thyme, basil, and parsley with garlic powder. These blends are great with greens or pasta, keeping the chicken light and fresh.
Spiced and global finishes:
For heat, add Cajun seasoning or chili powder and serve with roasted veggies. Use taco seasoning for a Mexican bowl with rice and beans. For Asian dishes, glaze with teriyaki sauce during the last bake minutes. Swap cayenne or red pepper flakes to adjust the heat without changing the basic technique.
Try different flavors each week to keep meals exciting. Small changes in rubs and glazes can turn the same easy baked chicken breast recipe into many different dishes.
Quick baked chicken breast tips for weeknight dinners and meal prep
Make weeknight cooking easy with a few tricks. Choose a fast high-heat method for quick meals or a gentle roast for more flexibility. Both are great for easy baked chicken breast recipes and meal prep.

Faster high-heat method vs moderate-heat method
Roast at 450°F for a short time to seal juices and save time. This method is perfect for fast dinners. Cut veggies a bit thicker to avoid overbrowning.
For more flexibility, try 400°F. It’s better for those who are new to cooking or have a hot oven. This method is more forgiving.
Make-ahead seasoning and overnight refrigerated prep
Season chicken with oil and spices up to 24 hours before. Store it in the fridge, then let it come to room temperature for 15 minutes before baking. This ensures even cooking.
A 10-minute brine at room temperature adds moisture. A longer brine, up to 24 hours, makes the chicken even juicier for meal prep.
Sheet pan meals: add vegetables for an all-in-one dinner
Place sliced mushrooms, onions, zucchini, and bell peppers around the chicken. Toss them with oil and seasonings to match the chicken’s flavors. For high-heat cooking, cut veggies thicker for tender centers and caramelized edges.
Use these tips to make weeknight cooking faster and easier. They help create a reliable easy baked chicken breast recipe for busy days and meal prep.
Healthy baked chicken breast: nutrition and portion tips
Keeping meals simple is key to eating well without extra work. A plain baked chicken breast is packed with lean protein. It helps repair muscles and keeps you full. Use it in salads, bowls, or sandwiches for a balanced meal.
Lean protein baked chicken breast offers about 32–48 grams of protein per serving. This depends on the size and any added fats. The calories range from 196 to 324 for common sizes. This makes baked chicken a great choice for those watching their weight or leading an active life.
For cooking, choose olive or avocado oil for heart-healthy fats. If you prefer butter, use a small amount or a spray to cut down on saturated fat. For sauces, pick low-sugar options like sugar-free BBQ. Or, brighten dishes with lemon, herbs, and spices to keep calories low.
Adults should aim for 4–6 ounces cooked chicken per serving. Cooking several breasts at once saves time. You can slice, shred, or leave them whole to mix up meals. Store portions in airtight containers for quick reheats and easy meal prep.
Below is a quick reference to help you portion and compare basic nutrition for common cooked serving sizes.
| Cooked Portion | Approx. Calories | Protein (g) | Notes |
|---|---|---|---|
| 4 oz (113 g) | 196 | 32 | Lean option for salads and light meals |
| 5 oz (142 g) | 245 | 40 | Balanced portion for dinner with sides |
| 6 oz (170 g) | 294 | 48 | Higher-protein serving for active adults |
Use the table to adjust portions to your needs. When you batch-cook baked chicken breast, label containers with dates and portion sizes. This keeps meal prep organized and healthy.
Storage, reheating, and freezing baked chicken breast
Keep leftover chicken cool to preserve taste and safety. Let it cool a bit, then put it in airtight containers. Slicing before storing helps it cool faster and makes meals quicker.

How to store cooled chicken in the refrigerator safely
Use shallow containers to chill chicken quickly. Avoid stacking hot pieces. Label containers with the date to keep meals fresh.
Best reheating methods to preserve juiciness
To reheat without drying out, place chicken in a dish with water or broth. Cover with foil and heat at 325°F for 10–15 minutes. Make sure it reaches 165°F.
Air fryer reheating gives crisp edges. Brush with oil and heat at 350°F for 2–3 minutes each side. The microwave is fast but can make meat chewy. Use short bursts at medium power with a damp paper towel.
Freezing cooked chicken for up to 3 months and thawing tips
To freeze, wrap chicken tightly in plastic wrap or use freezer-safe bags. Vacuum sealing is best. Cooked chicken can be frozen for up to 3–4 months safely.
Thaw frozen chicken in the fridge overnight before reheating. Use thawed chicken in casseroles, soups, tacos, or shredded dishes. If you need to freeze again, reheat to 165°F first.
Follow these steps to keep taste and safety while storing, reheating, and freezing baked chicken breast.
Common mistakes and troubleshooting for juicy oven baked chicken
Want a juicy baked chicken breast but a few simple errors can turn it dry or bland. This guide points out common mistakes and gives fixes. So, you can get consistent results when baking chicken for weeknight meals or meal prep.
Overcooking is the most frequent problem. Signs include a very firm texture, stringy fibers, and dryness. Use an instant-read thermometer and pull the breasts when they reach about 160°F. Carryover cooking will bring them to 165°F while they rest. Follow thickness-based time charts and rest the meat for at least five minutes to let juices redistribute.
Under-seasoning leaves chicken tasting flat. Salt is the most impactful seasoning; increase it slightly if flavor is weak. Rub spices into both sides and try a quick sauce or a squeeze of lemon and chopped parsley at the end. For deeper flavor, season ahead: refrigerate breasts with oil and spices up to 24 hours before baking.
Uneven cooking happens when pieces vary in thickness. Pounding breasts to uniform thickness is the preferred fix. Cut very large breasts in half if needed. A quick brine helps moisture distribution when you cannot pound. For single, uneven pieces, tent the thicker part with foil partway through baking or position thicker ends in a slightly cooler area of the oven.
Below is a compact troubleshooting table that matches common symptoms to causes and quick fixes. Use it to avoid common baked chicken breast mistakes and to perfect how to bake chicken breast for a juicy baked chicken breast every time.
| Symptom | Likely Cause | Fast Fix | Preventive Step |
|---|---|---|---|
| Dry, chalky texture | Overcooked internal temp | Remove at 160°F, rest 5–10 min | Use instant-read thermometer; follow time chart |
| Stringy meat | Cooked too long at high heat | Lower oven temp slightly, check earlier | Pound to even thickness for uniform cook |
| Blah, low flavor | Under-seasoned or uneven rub | Finish with a brightener: lemon or herbs | Rub spices into both sides; salt ahead |
| Center raw while edges done | Varied thickness | Tent thicker area with foil mid-bake | Pound, halve large breasts, or brine briefly |
| Uneven browning | Oven hotspots or placement | Rotate pan and broil briefly for color | Use center rack and preheat fully |
Conclusion
To make a juicy baked chicken breast, follow a few easy steps. Start by picking similar boneless, skinless breasts. Then, pound them to make them even.
Next, pat the chicken dry and lightly oil it. Use a simple seasoning blend before baking. Choose a baking temperature that suits your method.
Use a thermometer to check the chicken’s internal temperature. Aim for 160–165°F. Let it rest for 5–10 minutes to finish cooking and redistribute juices.
This method ensures consistent results, whether you’re using an easy recipe or a quicker method. The finished breasts are great for many dishes. Slice them for salads, layer in sandwiches, shred for soups, or portion for meal prep.
Try different flavors like BBQ, lemon-pepper, Italian herbs, Cajun, or teriyaki. This way, you can match your taste and health goals.
Remember to store cooked chicken safely. Keep it in the fridge for 3–4 days or freeze for up to 3 months. Always check the internal temperature when reheating. This ensures your chicken stays juicy and safe to eat.