
Ever felt relieved when a dessert doesn’t heat up the kitchen? Maybe you’ve stood in front of a warm oven on a summer day and wished for something easier. An easy no bake cheesecake offers that calm. It’s a creamy, make-ahead dessert that feels special without the hassle.
This homemade no bake cheesecake uses full-fat cream cheese—Philadelphia brand works well. It also includes chilled whipped components like heavy cream or Cool Whip for stability. Fresh lemon juice and vanilla make the filling bright and smooth. A graham cracker crust of crumbs, melted butter, and a touch of sugar keeps the base crisp and reliable.
Prep time is short (about 20–30 minutes hands-on) and chill time does the rest. Follow the simple steps and you’ll have an easy no bake cheesecake recipe. It sets firm enough for clean slices, stores well in the fridge, and adapts to any topping you like.
Table of Contents
Key Takeaways
- No oven needed—quick hands-on prep and long chill time make this a great make-ahead dessert.
- Use full-fat cream cheese and chilled whipped cream for a stable, creamy texture.
- Graham cracker crust with melted butter is the classic, dependable base.
- Prep ~20–30 minutes; chill 4–12 hours depending on desired firmness.
- Versatile for toppings and single-serve variations; stores refrigerated for a few days.
Why choose a no bake cheesecake for quick desserts
Need a fast dessert that keeps your kitchen cool? A quick no bake cheesecake is perfect. Prep takes about 20 minutes, then the fridge does the rest. It’s great for parties, potlucks, and summer gatherings.
Benefits of an easy no bake cheesecake recipe
No-bake recipes save time and effort. The best no bake cheesecake is creamy and light, with easy mixing. You avoid oven worries and get a tangy taste from cream cheese and lemon.
Make-ahead is a big plus. Assemble the night before to save time on serving day. This is a big benefit for stress-free hosting.
Texture and flavor differences compared to baked cheesecake
No-bake cheesecakes are lighter and mousse-like. The filling is smoother than baked ones. If you like a thick slice, go for baked.
Flavors stay bright without overcooking. You get a tangy taste with a silky feel. Choose no-bake for a quick, creamy dessert. Save baked for denser, traditional cheesecakes.
Essential ingredients for homemade no bake cheesecake
Looking for a reliable list of ingredients for a creamy dessert? Here’s a guide to the best no bake cheesecake ingredients. You’ll also find smart swaps to try.
Core ingredients for the crust and filling
For the crust, use 7 oz (200 g) of graham crackers or digestive biscuits, crushed finely. Mix with ½ cup of melted butter and 2 tablespoons of granulated sugar. Press into a 7-in (20 cm) springform pan for a smooth base.
For the filling, start with 26 oz (750 g) of full-fat cream cheese, like Philadelphia. Add 1¼ cups of sifted powdered sugar, ½ cup of sour cream, 1 tablespoon of fresh lemon juice, 1 teaspoon of vanilla, and 1 cup of cold heavy whipping cream whipped to soft peaks. Full-fat cream cheese is key for a smooth filling.
Ingredient quality and substitutions that work
For a lighter version, use 24 oz cream cheese, 1 cup powdered sugar, and 16 oz Extra Creamy Cool Whip. Cool Whip helps with heat tolerance, great for outdoor serving.
Try different flavors by using 1½ cups of graham crumbs with 4–6 tablespoons of butter, a bit of brown sugar, and cinnamon. For the filling, use 16 oz cream cheese, 1 cup powdered sugar, 1/3 cup sour cream, 1 tablespoon lemon juice, 1 teaspoon vanilla, and 1¼ cups whipping cream.
Avoid fat-free cream cheese for better texture. Use sifted powdered sugar to avoid lumps. Vanilla paste or extract work well. Swap lemon juice for another citrus if you prefer, but it will change the flavor.
- Crust alternatives: Oreo crumb crust, digestive biscuits, or neutral tea cookies.
- Stability tips: Cold heavy cream whipped properly or Cool Whip will keep the no bake cheesecake with cream cheese firm.
- Best no bake cheesecake ingredients summary: full-fat cream cheese, sifted powdered sugar, cold whipping cream, quality butter, and fine crumbs.
Equipment and prep tips for a flawless crust
Creating a solid base for your no bake cheesecake starts with the right tools and habits. A clean workspace, the right pans, and finely ground crumbs are key. Here are the tools you need and step-by-step tips to ensure your crust is perfect for slicing and serving.
Tools you’ll need
First, gather all the tools you need for your no bake cheesecake. A food processor is best for crushing crackers. If you don’t have one, a zip-top bag and a rolling pin will do the trick.
Choose a 7-inch (20 cm) springform pan for clean edges or a pie plate for a single serving. Use measuring cups and spoons. Make sure you have mixing bowls, a stand mixer, a whisk, and a spatula for the filling.
An offset palette knife is great for smoothing the filling. Parchment paper makes it easy to release the pan. A chef’s knife and a hot towel or small blowtorch help remove the pan before you slice. These tools make the process smooth and predictable.
How to make and set the graham cracker crust
Crush 7 oz (200 g) graham crackers into fine crumbs in a food processor. Mix these crumbs with ½ cup melted butter and 2 tablespoons granulated sugar until they feel like damp sand. Press this mixture firmly into the bottom of a springform pan lined with parchment paper.
For a different taste, use ¼ cup powdered sugar or ¼ cup brown sugar with ½ teaspoon cinnamon. Adjust the melted butter to 4–6 tablespoons for the desired firmness. You can also use a store-bought crust for convenience.
Press the crumbs down evenly with the flat bottom of a cup to avoid a crumbly base. Chill the crust in the fridge while you prepare the filling to prevent it from getting soggy. For extra firmness, bake it at 375°F for 5–6 minutes, then cool it before adding the filling.
| Step | Action | Why it matters |
|---|---|---|
| Crush crackers | Process 7 oz graham crackers to fine crumbs or crush in a zip-top bag | Fine crumbs bind better and create an even no bake cheesecake crust |
| Mix | Combine crumbs with ½ cup melted butter and sugar; mix to damp-sand texture | Proper butter ratio prevents dry or greasy crust |
| Press | Line pan with parchment and press crumbs with a cup bottom or tamping tool | Firm, even pressing avoids crumbling when you slice |
| Chill or bake | Chill in fridge to set; optionally bake 5–6 minutes at 375°F for extra firmness | Chilling prevents sogginess; brief bake yields a sturdier base for heavy fillings |
| Release tips | Run a hot towel around pan or use a small blowtorch to loosen edges before opening | Clean release keeps edges intact for neat presentation |
Follow these tips every time you make a no bake cheesecake crust. Fine crumbs, firm pressing, and chilling help avoid cracks and soggy bottoms. With the right tools and careful steps, your graham cracker crust will always turn out right.
Step-by-step filling method for a stable no bake cheesecake
Getting the filling right is key. Below, you’ll find a simple whipping and folding method. This will help you make a light, stable no bake cheesecake filling. Read each step carefully to avoid common mistakes that can make the filling runny.
Whipping and folding technique
Start with full-fat Philadelphia or Kraft cream cheese at room temperature. Beat it with sifted powdered sugar until it’s smooth and thick. Use a stand mixer with the paddle attachment.
Add full-fat sour cream and fresh lemon juice or vanilla. Mix until everything is even.
Chill heavy cream and whip it cold to firm peaks. Use a handheld mixer or stand mixer. Stop when peaks stand straight but are not grainy. This traps air, giving the filling body without collapse.
Lighten the cream cheese base by folding in a single spoonful of whipped cream. Use a rubber spatula and a deliberate under-and-over motion. Fold in the remaining whipped cream in two additions until streaks disappear. Pour the mixture onto the chilled crust and smooth the top.
Tips to prevent a runny filling
Choose full-fat cream cheese and full-fat sour cream for structure. Low-fat dairy releases more water and can make the filling soft. Keep cream cheese at room temperature but not warm to avoid a thin base.
Sift powdered sugar to prevent lumps that resist blending. Use cold heavy cream for whipping; warm cream fails to reach stiff peaks. Avoid overbeating whipped cream or it will weep and lose volume.
For extra stability, consider thawed Cool Whip folded in at the end. Press out large air pockets after you pour the filling to limit collapse as the cheesecake settles. Cover loosely with plastic and use toothpicks to keep wrap off the surface while chilling.
| Step | Action | Why it matters |
|---|---|---|
| 1 | Beat room-temp full-fat cream cheese with sifted powdered sugar | Creates a smooth, thick base for a stable no bake cheesecake recipe |
| 2 | Add full-fat sour cream and lemon or vanilla; mix until even | Balances tang and improves creaminess without thinning |
| 3 | Whip chilled heavy cream to firm peaks | Provides volume and structure when folded in using the whipping technique |
| 4 | Fold one spoonful of whipped cream to lighten, then fold remaining in two additions | Preserves air and prevents deflating the no bake cheesecake filling |
| 5 | Pour onto chilled crust, smooth, press out large pockets, cover loosely | Ensures even set and helps prevent runny no bake cheesecake |
Chilling, setting times, and troubleshooting common issues
After you finish the filling, patience is key. It ensures a clean slice and stable texture. Place the pan in the coldest part of your fridge. Resist the urge to test it early.
Recommended chill times for best texture
For a simple, scoopable finish, chill for at least 6 hours. Many bakers prefer 8 hours or overnight for clean slices. Chilling up to 12 hours makes it firm and ready for slicing.
For quick gatherings, a firm crust and colder ingredients help. But expect a softer bite. Keep notes on how your recipe responds to chill time.
Troubleshooting why your cheesecake didn’t set
If it didn’t set, check your ingredients and technique. Low-fat or fat-free cream cheese can be a problem. Use full-fat brick cream cheese, like Philadelphia, for better structure.
Warm cream cheese can make the filling thin. Bring it to room temperature but avoid soft or melted blocks. Whipped cream that never reached stiff peaks will fail to support the filling.
If the problem is time, extend refrigeration by another 6–12 hours. For fillings that are salvageable, briefly re-whip the mixture to add structure. Avoid overbeating.
For very loose fillings, fold in a small amount of stabilized whipped cream or a touch of unflavored gelatin. This will firm the bulk without changing flavor dramatically.
Use these quick no bake cheesecake tips while assembling: use full-fat dairy, chill your bowl and beaters for the cream, and avoid pressing plastic wrap directly on the surface. To prevent wrap marks, set toothpicks upright around the center and drape plastic over them as tenting supports. To release a springform pan more cleanly, run a hot towel around the sides or briefly warm the rim with a kitchen blowtorch, then slide a palette knife around the edge before unlatching.
No bake cheesecake variations: bars, cups, bites, and flavored fills
Make many tasty treats from one simple filling. You can shape it into bars, fill jars, or make bite-sized treats. Each way is quick and perfect for parties.
No bake cheesecake bars and crust variations
Make bars in a rectangular pan. Try different crusts like Oreo or digestive biscuits. Add more butter for a firmer crust. For extra stability, bake the crust at 375°F for 5–6 minutes before adding the filling.
No bake cheesecake cups, bites, and single-serve ideas
Make elegant cups in mason jars or glasses. For casual events, use mini liners for bites. These single-serve treats are easy to grab and go.
Flavor add-ins and topping ideas
Add Nutella for a chocolate-hazelnut twist or chocolate chips for texture. Zest and lemon juice add brightness. Top with fruit, caramel, or chocolate ganache. Whipped cream and canned fruit are great finishes.
| Format | Best Crust | Set Time | Flavor Ideas |
|---|---|---|---|
| Bars | Graham cracker or Oreo; increase butter for firmness | 3–4 hours in refrigerator; overnight for best texture | Plain, Nutella, chocolate chip, berry swirl |
| Cups | Crushed cookies or pre-baked mini crusts | 1–2 hours; small jars set quicker | Fresh berry compote, lemon curd, salted caramel |
| Bites | Pressed crumb base in mini liners | 45–90 minutes; ideal for last-minute parties | Nutella, mini chocolate chips, crushed Oreos |
| Flavored no bake cheesecake | Any of the above, adjusted to flavor | Depends on size; chill until firm | Citrus zest, extracts, fruit purees, ganache |
Serving, slicing, and presentation tips for clean slices
Start by loosening the cake from the pan before you try to serve. Warm a kitchen towel with hot water and wrap it briefly around the springform sides to release the edge. Slide an offset palette knife gently around the rim to separate filling from pan. If you used parchment under the crust, lift the cheesecake onto a serving plate for easier handling.
Heat a chef’s knife under hot tap water, dry it with a towel, then make your first cut. Wipe the blade clean and reheat between cuts to keep each piece neat. For bars, use a sharp straight-edge or serrated knife and follow the same clean-and-warm routine.
For a smooth edge, press the knife straight down without sawing. Chill the cheesecake until very firm before slicing; a firmer cake gives you the best chance to slice no bake cheesecake with clean, even pieces.
Presentation ideas for gatherings
Set up a toppings bar so guests can customize how you serve no bake cheesecake. Offer berry sauce, salted caramel, chocolate syrup, crushed cookies, and fresh berries. Keep wet toppings in small bowls and add them just before you serve to keep leftovers crisp.
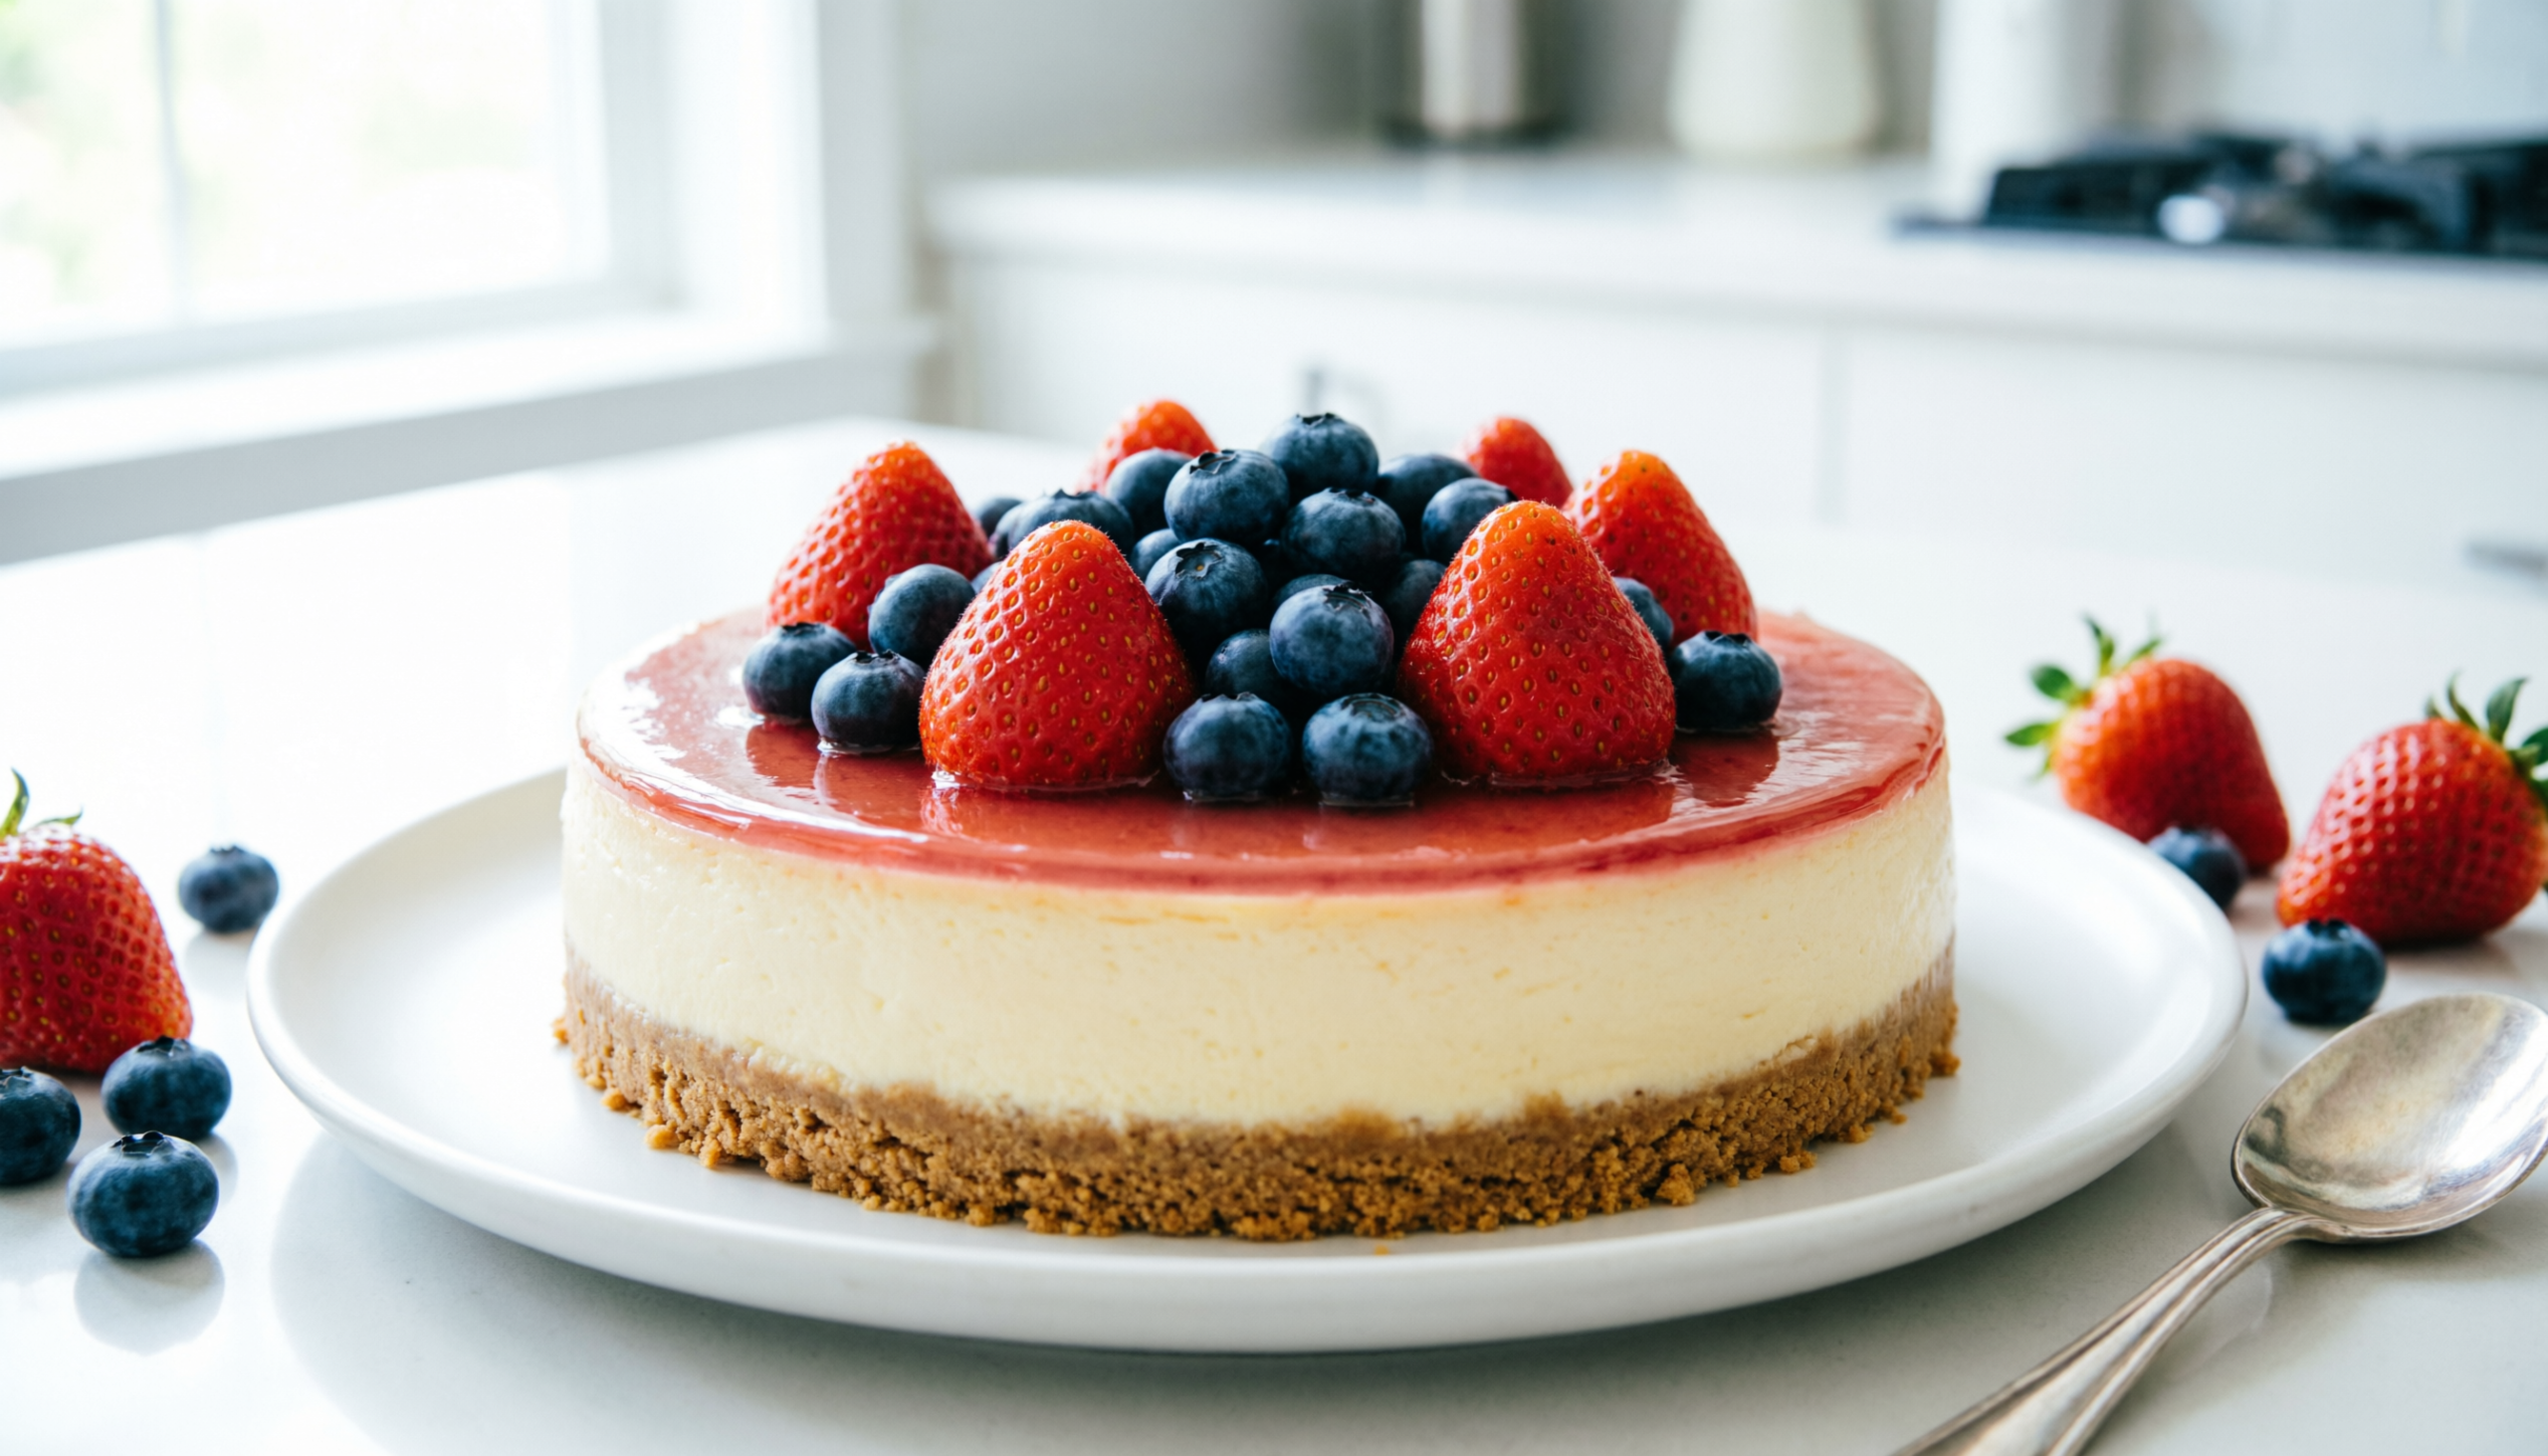
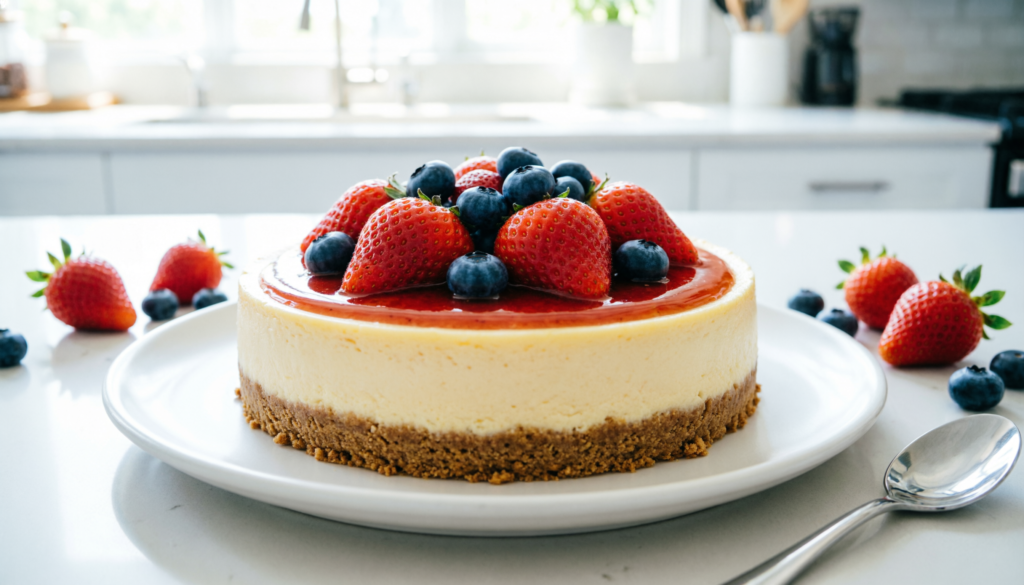
For patriotic events, pick red and blue fruits like strawberries and blueberries for bold presentation no bake cheesecake styling. Individual no-bake cheesecake cups are ideal for picnics and make it easy to slice no bake cheesecake into portable portions.
Garnish each slice with a mint sprig or a light lemon zest for color and brightness. These small touches improve the look and help you serve no bake cheesecake that feels special without extra fuss.
Storage, make-ahead, and freezing instructions
To keep your no bake cheesecake fresh, follow these simple steps. Wrap a whole cake tightly with plastic wrap or place slices in an airtight container. This keeps the flavors fresh. Remove fresh fruit or crunchy toppings and store them separately to avoid sogginess.
How long you can store leftovers
No bake cheesecake can be stored in the fridge for a short time. For slices, you can enjoy them for 3 days if loosely wrapped. If you use an airtight container, you can extend this to 4–5 days without losing much texture.
For the best storage, keep the filling chilled and the toppings separate. This helps keep the texture and flavor when you serve it later.
Freezing and thawing no bake cheesecake
If you need to store it longer, you can freeze the cheesecake after it’s fully set. Wrap a whole cake first in plastic wrap, then in aluminum foil. You can freeze it for up to three months with little quality loss.
Freezing individual slices makes thawing and serving easier. Wrap each slice tightly to prevent freezer burn. If you freeze dessert cups, cover them with a lid or plastic film before freezing.
To thaw, move the frozen cheesecake to the fridge and let it thaw overnight. Avoid thawing at room temperature to prevent softening the dairy filling. After thawing, add fresh toppings and serve chilled.
| Storage Method | Recommended Duration | Best Practice |
|---|---|---|
| Refrigerator, loosely wrapped | Up to 3 days | Keep toppings separate; seal with plastic wrap |
| Refrigerator, airtight container | 4–5 days | Store slices or whole cake; remove fruit toppings |
| Freezer, whole cake wrapped | Up to 3 months | Wrap in plastic then foil; label with date |
| Freezer, individual slices | Up to 3 months | Wrap tightly for easier thawing and serving |
| Thawing | Overnight in refrigerator | Avoid room-temperature thawing for safety and texture |
For make-ahead no bake cheesecake, assemble the day before and chill 8–12 hours for the best set. When freezing, plan ahead so you can freeze only after the filling is firm. If you freeze and thaw later, refresh with toppings right before serving to keep it crisp. Follow these guidelines for storing extra portions to keep each slice tasting fresh.
Safety and serving at outdoor events
When you take an easy no bake cheesecake to a picnic or backyard barbecue, a little planning is key. Cold helps keep the cheesecake firm and slows down bacteria growth. Pack it in a chilled cooler and serve quickly to ensure a clean and fresh taste.
Handling and time limits at picnics and BBQs
Keep the cheesecake cold below 40°F (4°C) during transport. If the weather is mild, serve in small batches. At temperatures under 90°F, don’t leave cream-based desserts out more than two hours. When it’s hotter than 90°F, cut that window to one hour to protect texture and food safety.
Slice only what you will serve right away. Return leftovers to the cooler with ice packs. For hot days, keep slices on chilled plates or a marble slab to slow softening while you serve.
Ingredient safety notes
Use pasteurized cream cheese and dairy products common in U.S. grocery stores to reduce risk. If you choose a Cool Whip–based filling, it withstands brief warmth a bit better, yet it needs refrigeration.
Label desserts for common allergens such as dairy and gluten. Offer gluten-free crusts made from certified gluten-free cookies or an almond-meal crust so guests with sensitivities can indulge safely.
Practical picnic cheesecake tips
- Transport in an insulated cooler with ice packs and a rigid container to prevent squashing.
- Ship toppings separately to avoid soggy fruit and to limit time the cheesecake spends unrefrigerated.
- Scoop or slice with a warm, wiped knife for neater portions; re-chill between cuts if the filling softens.
- Serve in shade or under a canopy to reduce exposure to direct sun and to improve no bake cheesecake heat safety.
Follow these steps and you can safely serve cheesecake outdoors while keeping taste and texture intact. Good planning cuts waste and keeps guests confident about no bake cheesecake safety at your next gathering.
Conclusion
You can make an easy no bake cheesecake recipe with just a little effort. Use full-fat cream cheese, sour cream, and whipped heavy cream for the creamiest filling. Press the crust firmly and chill it to get clean slices.
Follow simple steps to avoid problems. Crush crumbs finely and press the crust well. Fold whipped cream gently and sift powdered sugar into the filling. Chill the cheesecake for 4–12 hours, or overnight, for the best results.
Warm a knife between slices for neat presentation. Store it in the fridge for 3–5 days or freeze for up to 3 months. Keep it cold when serving outdoors.
Feel free to get creative with your no bake cheesecake. Try making bars, cups, or bites. Swap the crust for an Oreo or digestive one. Add Nutella, fruit sauces, caramel, or cookie crumbles for extra flavor. With these tips, you’ll have a versatile dessert ready whenever you need it.