
Desserts that are easy to make but taste amazing are truly magical. Imagine it’s a hot summer day or you’re in a rush, but you can’t stop thinking about dessert. That’s when No-Bake Fudgy Squares come to the rescue. They offer a rich, fudgy treat with a crumbly cookie crust that’s perfect for any time.
In this guide, you’ll learn how to make these treats quickly. Let’s explore the world of No-Bake Fudgy Squares together. We’ll make a dessert that will impress everyone, including yourself!
Table of Contents
Key Takeaways
- No-Bake Fudgy Squares are the perfect solution for quick desserts.
- With just 20 minutes of active time, you can create an indulgent treat.
- The recipe features a delicious combination of brownies and fudge.
- A cookie crust adds a delightful crunch to the fudgy texture.
- No ovens required—ideal for hot days or busy schedules!
Introduction to No-Bake Desserts
No-bake desserts are a great way to cool down without cooking. They’re perfect for hot days when you don’t want to heat up the kitchen. You can make many tasty treats like cheesecakes, cookies, and bars.
This guide focuses on making No-Bake Fudgy Squares. They’re easy to make and incredibly delicious.
Why Choose No-Bake Fudgy Squares?
No-Bake Fudgy Squares offer a tasty chocolate treat without baking. They’re great for surprise parties or when you suddenly crave something sweet. The mix of cookie base and fudgy layer makes each bite a joy.
Making these desserts is quick and easy, perfect for when you’re busy. You can whip up a batch fast, and cleaning up is simple. No-Bake Fudgy Squares are a way to wow your loved ones without spending hours cooking.
Ingredients for No-Bake Fudgy Squares
To make delicious chocolate squares, start with chocolate wafer cookies. They make the crust and add a nice crunch. Then, use top-notch bittersweet chocolate for a rich filling. Sweetened condensed milk adds creaminess, making the squares smooth.
Butter is key for binding the crust and topping. A bit of instant espresso powder boosts the chocolate taste. Don’t forget granulated sugar, vanilla extract, and a pinch of salt. They balance the flavors, making the treat enjoyable for all.
| Ingredient | Purpose |
|---|---|
| Chocolate wafer cookies | Forms the crunchy crust |
| Bittersweet chocolate | Main component of the fudgy filling |
| Sweetened condensed milk | Provides creaminess and moisture |
| Butter | Binds crust and topping together |
| Instant espresso powder | Enhances chocolate flavor |
| Granulated sugar | Balances sweetness |
| Vanilla extract | Adds depth of flavor |
| Salt | Enhances overall taste |
Preparing the Cookie Crust

The cookie crust is key for your no-bake fudgy squares. A great crust can really enhance the dessert’s texture and taste. Start with chocolate wafer cookies for a rich base that pairs well with the fudge.
Pulsing the Chocolate Wafer Cookies
Begin by pulsing chocolate wafer cookies in a food processor. You want them to be fine but not powdery. This texture helps the crust stay together when chilled, keeping every bite perfect.
For the best results, pour the crumbs into a mixing bowl for the next step.
Melted Butter and Its Importance
Adding melted butter to the cookie crumbs is key for binding. The warm butter brings out the cookies’ flavor and helps the crust set in the freezer. This step adds stability and richness to your dessert. Mix well until all crumbs are coated, and your crust is ready.
| Step | Action | Result |
|---|---|---|
| 1 | Pulse chocolate wafer cookies | Finely ground but crumbly texture |
| 2 | Add melted butter | Rich flavor and binding agent |
| 3 | Mix thoroughly | Well-coated cookie crumbs |
Making the Fudgy Chocolate Layer
Creating the fudgy chocolate layer is key to a delicious dessert. It pairs well with the cookie crust, making it unforgettable. Start by melting two cups of bittersweet chocolate. This type of chocolate is great because it’s sweet but also deep.
You can melt it in the microwave or a double boiler. Stir often to prevent burning.
Melting Bittersweet Chocolate
Melting bittersweet chocolate takes patience. You want it smooth. Mix it with butter for better flavor and texture.
Once it’s melted, take it off the heat. Let it cool a bit before adding more ingredients.
Mixing in Sweetened Condensed Milk
Now, mix in sweetened condensed milk. It makes the chocolate layer creamy and rich. For an extra boost, add instant espresso and a pinch of salt.
These will make your dessert even more decadent. Pour the chocolate layer over the cookie crust. Get ready for a treat that everyone will love.
Assembling the No-Bake Fudgy Squares

Now that you have the fudgy chocolate layer ready, it’s time to put the no-bake fudgy squares together. Make sure the chocolate is spread evenly to improve both looks and taste. Use an offset spatula for a smooth finish on top of the cookie crust.
Layering the Chocolate Filling
Pour the fudgy chocolate mixture over the chilled cookie crust. Spread it from the center outwards for an even layer. This careful layering makes your squares taste and feel amazing.
Refrigeration for Perfect Set
After assembling, let the squares chill for about an hour. This step helps the chocolate filling set right, making them easy to cut into squares. A chilled no-bake recipe means each piece is firm yet creamy, showing off the chocolate flavor.
Finishing Touch: Chocolate Ganache Topping
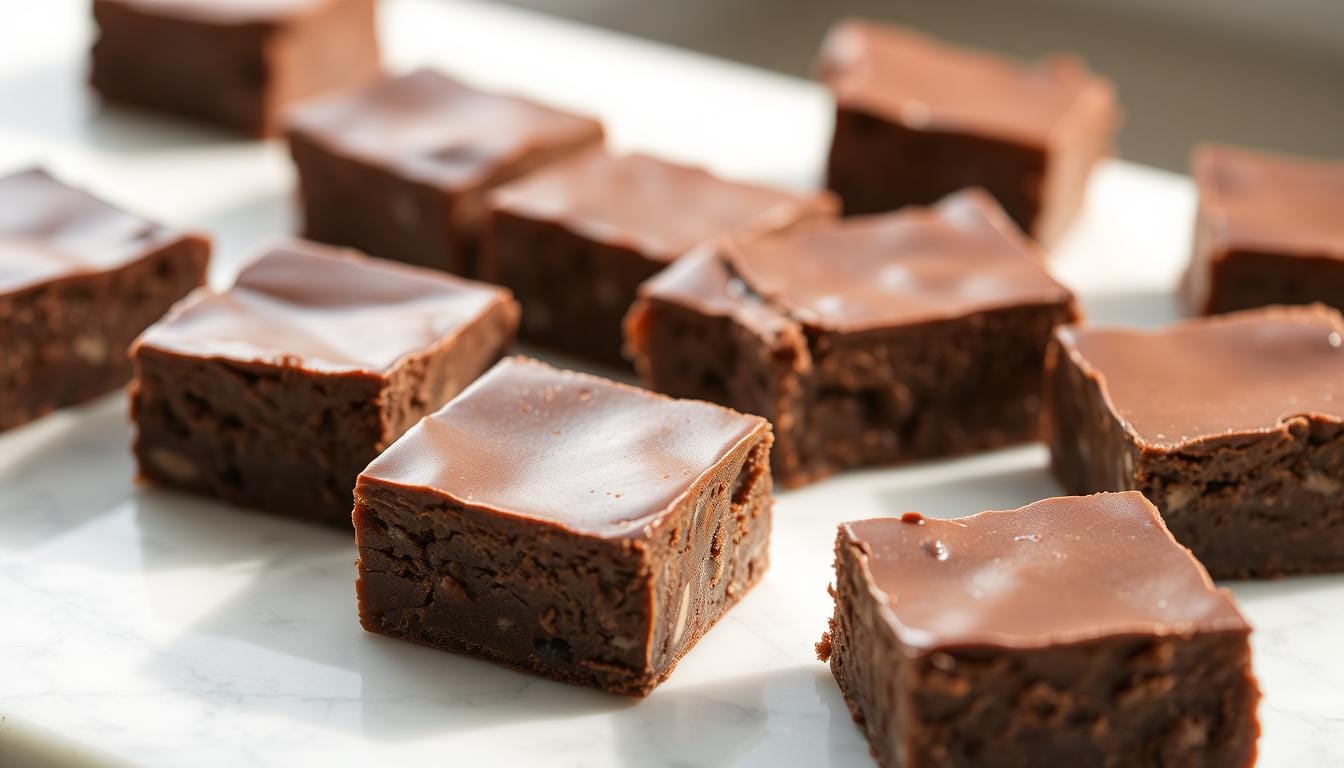
A chocolate ganache topping adds an exquisite layer to your No-Bake Fudgy Squares. This glossy finish beautifies the dessert and enhances its rich, fudgy goodness. To achieve a perfect ganache, start by melting bittersweet chocolate with butter in the microwave until smooth.
Pour this luxurious mixture over the cooled chocolate filling. Let it create a silky layer that reflects light beautifully.
Creating a Glossy Finish
The key to a stunning chocolate ganache topping lies in the chocolate’s quality and the melting technique. Using high-quality bittersweet chocolate ensures a rich flavor. As the ganache cools, the surface will develop a shiny appearance.
This gives your squares an elegant and professional look.
Adding Flaky Sea Salt
For an elevated flavor profile, sprinkle flaky sea salt on top of the ganache just before serving. This small addition balances the sweetness of the chocolate and adds a delightful crunch. The combination of a glossy finish and flaky sea salt transforms these fudgy squares into a gourmet treat, perfect for any occasion.
Serving Suggestions for Fudgy Squares
Serving no-bake fudgy squares can be a delightful experience. Start by cutting the squares into bite-sized pieces. Arrange them on a beautiful platter.
Enhance the visual appeal by adding fresh raspberries or a light dusting of cocoa powder. This will make the chocolate squares look even more appealing.
These fudgy squares are great on their own, but you can also serve them in different ways. Pair them with a scoop of vanilla ice cream for a creamy contrast. Or, serve with a strong cup of coffee to enhance the rich flavors.
With their versatility, these fudgy squares are sure to impress your guests. They promise to leave a lasting impression.
Make Ahead and Storage Tips
No-Bake Fudgy Squares are perfect for any event. Making them ahead of time means you can spend more time with your guests. Store them in an airtight container in the fridge for up to a week. This keeps their flavor and texture just right.
For longer storage, freeze them. Wrap each square in plastic wrap and foil. They can stay frozen for a month. Just thaw them in the fridge overnight before serving. This way, they stay soft and delicious without needing to be reheated.
Variations and Customizations

Creating no-bake fudgy squares is fun because you can change them up in many ways. You can add chopped nuts like walnuts or almonds for a crunchy texture. Or, mix in peanut butter or almond butter for a richer taste.
Want a gluten-free treat? Just swap out the regular wafer cookies for gluten-free ones. This way, everyone can enjoy the fudgy goodness. Adding flavors like orange zest or peppermint extract makes it perfect for holidays.
These changes let you make a fudgy dessert that’s truly yours. It’s great for any party or special event.
Final Thoughts on No-Bake Fudgy Squares
No-bake fudgy squares are a great choice for a tasty and easy dessert. They’re perfect for beginners and experts alike. They’re great for any event, from movie nights to big celebrations.
The mix of a crunchy cookie base, smooth filling, and chocolate ganache is amazing. You can wow your guests with these treats without baking. They’re also super versatile, perfect with fresh fruits or whipped cream.
Don’t forget to try no-bake fudgy squares when you’re looking for desserts. They’re not just delicious but also fun to make and share. Enjoy making and sharing this sweet treat today!
Conclusion
This guide to Easy No-Bake Fudgy Squares has shown you how to make a simple yet tasty dessert. You only need a few ingredients and no baking. These squares are great for when you want something sweet.
Their rich chocolate layers are a hit with your taste buds. Plus, you can make each batch your own way. This makes them perfect for any occasion.
Exploring this easy recipe, you can get creative with flavors. You can stick to the classic or add your own twist. These fudgy squares are sure to please.
So, go ahead and make these treats. Enjoy the sweet moments they bring to your table. And don’t worry about the baking hassle.
In short, this no-bake dessert is a must-have for any time. It’s easy to make and delicious. It’s a great way to enjoy tasty flavors without the effort of baking.