
Nanaimo Bars are a classic Canadian dessert that feels like a warm hug. They have a crunchy graham cracker base, a creamy custard filling, and a smooth chocolate topping. Each bite is a story, your story.
These no-bake treats are easy to make, making them great for any occasion. Let’s dive into the world of Nanaimo Bars and discover the magic of Canadian cuisine.
Table of Contents
Key Takeaways
- Nanaimo Bars are a delicious, layered Canadian dessert.
- This no-bake recipe is easy to master at home.
- The bars consist of a graham cracker base, custard filling, and chocolate ganache topping.
- These rich treats are perfect for any occasion, from family gatherings to celebrations.
- Using high-quality ingredients enhances the flavor and texture of your Nanaimo Bars.
The Story Behind Nanaimo Bars
The history of Nanaimo Bars goes back to the 1950s in British Columbia. A local housewife shared her recipe in a community cookbook. This started a national trend, making them a beloved Canadian treat.
Their name honors Nanaimo, capturing the charm and indulgence of Canadian food.
The story of Nanaimo Bars is filled with mystery, thanks to their unique layers. The 1952 Women’s Auxiliary to the Nanaimo Hospital Cookbook played a big role in their rise. Today, Nanaimo Bars are a key part of Canadian culture, enjoyed at events like Expo 86.
Understanding the Layers of Nanaimo Bars
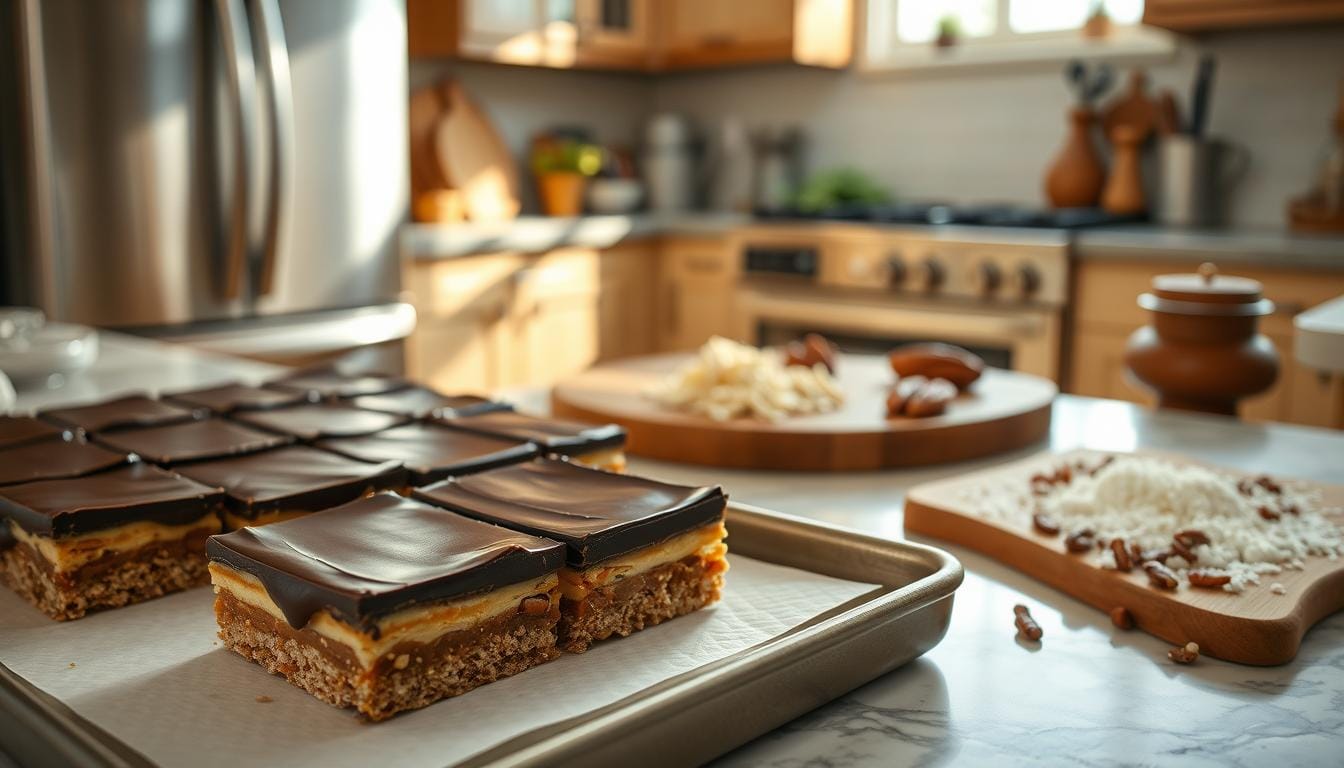
Nanaimo bars are a delightful treat with three distinct layers. Each layer adds its own flavor and texture, making it a delicious experience. This section explores the composition of these layered bars, detailing the base layer, filling, and topping.
The Base: Graham Cracker and Coconut Crust
The base layer of Nanaimo bars is a crunchy foundation. It’s made from graham cracker crumbs, shredded coconut, and finely chopped walnuts. This combination adds a lovely texture and a touch of sweetness.
The graham crackers provide a sturdy support for the creamy filling above. The coconut gives it a delightful chewiness.
The Filling: Creamy Custard Layer
This middle layer is known for its creamy custard-like texture. It’s made from butter, custard powder, and sugar. The filling often gets a boost from whipped cream, ensuring a smooth mouthfeel.
This creamy custard filling creates a perfect contrast to the crunchy base. It sets the stage for the rich topping.
The Topping: Rich Chocolate Ganache
The final layer is a lavish chocolate ganache. It crowns the Nanaimo bars with elegance. Made by melting semi-sweet chocolate combined with butter, the ganache offers a rich, indulgent finish.
This combination not only adds visual appeal but also enhances the overall flavor profile. It makes the layered bars even more irresistible.
By appreciating the delicate balance of these components, you can see how each element plays a vital role in the overall success of the Nanaimo bar. The distinct layers—each with its own unique qualities—come together to create a delicious experience. This dessert’s charm lies in its simplicity and the expertise involved in perfecting those layers.
Essential Ingredients for Perfect Nanaimo Bars
To make delicious Nanaimo Bars, you need the right ingredients. Each part, from the crust to the topping, is important. Using top-notch baking ingredients will make your Nanaimo Bars stand out.
Key Components of Each Layer
For great Nanaimo Bars, start with the base. Use unsalted butter, graham cracker crumbs, and sweetened coconut. This mix gives a nice crunch and sweetness.
The filling needs Bird’s Custard Powder for that creamy texture. For the topping, choose semi-sweet chocolate for a rich finish.
| Layer | Essential Ingredients | Quality Ingredient Recommendations |
|---|---|---|
| Base | Unsalted butter, graham cracker crumbs, sweetened coconut | Land O’Lakes Butter, Honey Maid Graham Crackers |
| Filling | Bird’s Custard Powder, powdered sugar, unsalted butter | Bird’s Custard, C&H Powdered Sugar |
| Topping | Semi-sweet chocolate, unsalted butter | Ghirardelli Semi-Sweet Chocolate, Plugra Butter |
Why Ingredient Quality Matters
Using high-quality ingredients is key. They improve flavor and texture, making the experience better. For instance, premium chocolate makes the topping richer and more delicious.
Kitchen Equipment Checklist

To make delicious Nanaimo Bars at home, you need the right tools and a good recipe. Having the right baking tools makes the process easier. Here’s a checklist of must-have tools and some alternatives for flexibility.
Must-Have Tools for Making Nanaimo Bars
- 8-inch square baking pan – provides the perfect size for even baking.
- Electric mixer – speeds up mixing for a creamy filling.
- Double boiler – ideal for melting chocolate without risk of burning. Can be substituted with a heatproof bowl over simmering water.
- Spatula – helps in spreading layers evenly.
- Measuring cups and spoons – accuracy in ingredient quantities ensures great results.
Alternative Tools You Can Use
- Microwave-safe dish – for melting ingredients if you don’t have a double boiler.
- Food processor – can replace mixing by hand, for the crust.
- Regular baking dish – if an 8-inch pan is unavailable, any similar-sized dish can work in a pinch.
Step-by-Step Instructions for Making Nanaimo Bars
Making your own Nanaimo Bars is a fun and rewarding experience. This guide will help you make layered bars, ensuring each layer is delicious and full of flavor.
Preparing the Base Layer
First, gather the ingredients for the base layer. You’ll need graham cracker crumbs, shredded coconut, melted butter, and sugar. Mix the crumbs, coconut, and sugar in a bowl. Add the melted butter and stir until everything is well mixed.
Pour the mixture into a greased pan and press it down to make an even layer. Refrigerate for about 30 minutes to set.
Crafting the Creamy Filling
Now, make the creamy filling. In another bowl, mix unsalted butter, powdered sugar, and vanilla pudding mix until smooth. Add milk slowly until the filling is thick and creamy.
Spread this filling over the chilled base layer. Make sure it’s smooth for a beautiful finish when you cut the bars.
Finishing with Chocolate
The last step is the chocolate topping. Melt dark chocolate with a bit of unsalted butter in a bowl over simmering water. Pour the melted chocolate over the creamy filling.
Refrigerate the pan again until the chocolate hardens. After a few hours, cut the bars into squares. Enjoy the mix of textures and flavors!
Chef’s Secret Techniques for Perfect Bars

To make your Nanaimo Bars truly stand out, it’s not just about the recipe. You need to control the temperature and focus on layering. These baking tips will help you create bars that taste amazing and look great too.
Temperature Control Tips
Start with ingredients at room temperature for the best texture. This simple step helps the ingredients mix better, making the custard layer smooth. Also, chill the bars after each layer to let each part set right.
This way, you get layers that look and taste fantastic. It’s all about the details.
Layering Techniques for Visual Appeal
Layering your Nanaimo Bars is key to their look. Pour each layer from the center to avoid mixing the layers. This method helps keep each layer distinct, making your bars look and taste better.
By following these techniques, you’ll improve your baking skills. Your Nanaimo Bars will be a hit.
| Layer | Temperature Tip | Layering Technique |
|---|---|---|
| Base Layer | Ensure butter is softened | Press firmly and evenly into the pan |
| Creamy Filling | Use room temperature butter and eggs | Spread from the center outwards |
| Chocolate Topping | Let chocolate cool slightly before pouring | Pour carefully to maintain layers |
Common Pitfalls and How to Avoid Them
When making desserts like Nanaimo Bars, you might face some challenges. Knowing how to fix these issues can make your baking better. It ensures you get a delicious treat every time.
Fixing a Crumbly Base
A crumbly base can be a problem. It might happen if there’s not enough moisture. Make sure you mix the melted butter and syrup well. This helps the dry ingredients stick together.
Adding a bit more butter can fix this issue. Also, press the base layer firmly into the pan. This helps it stick better.
Dealing with Grainy Fillings
A grainy filling can ruin the smooth texture you want. This usually happens if the ingredients aren’t mixed right. Make sure the butter and custard powder are well mixed before adding sugar.
Take your time while mixing. Getting a smooth consistency is key to a great dessert.
Preventing Layer Separation
Layer separation can be a problem if the filling is too warm when you add the chocolate ganache. Let the filling cool down completely before adding the ganache. This prevents a messy mix.
Also, refrigerating each layer briefly helps them stick together better. This avoids common baking mistakes.
Serving and Presentation Suggestions

How you present your Nanaimo Bars can really make a difference. Creative serving ideas can make the dessert’s layers stand out. Serving them in squares or modern shapes adds to the fun.
Adding a sprinkle of cocoa powder or caramel on top looks great. Using fancy plates or platters makes it even more appealing. Whether you go for classic or modern, it’s all about the presentation.
Pairing your Nanaimo Bars with the right drink can elevate the experience. A strong coffee balances the sweetness and brings out the flavors. Or, a glass of milk is a classic choice that everyone loves.
For a fancy touch, try pairing them with dessert wine. The sweetness and complexity of the wine make the experience unforgettable.
Recipe Variations to Try
Exploring different Nanaimo Bars variations opens up a world of flavors. From classic to modern, these changes cater to all tastes. You can try refreshing mint or rich peanut butter, making these bars perfect for everyone.
Mint and Peanut Butter Versions
Try mint-flavored Nanaimo Bars for a unique taste. Peppermint extract in the filling will excite your senses. Peanut butter versions add a nutty flavor that pairs well with chocolate.
Both options add new dimensions to the original recipe. They let you explore different flavors.
Gluten-Free and Vegan Options
People with dietary restrictions can enjoy these desserts too. For gluten-free, use almond flour or gluten-free cookies instead of graham crackers. Vegan options include plant-based butter, dairy-free chocolate, and egg substitutes.
These changes make it easy to share these treats with others. They ensure everyone can enjoy Nanaimo Bars, no matter their dietary needs.
Conclusion
Making Nanaimo Bars is more than just a recipe. It’s an art that blends tradition, patience, and creativity. This Canadian treat is loved for its rich history and unique design. Making it at home brings a piece of Canada into your kitchen.
This summary of the Nanaimo Bars recipe shows the key ingredients and techniques. It also celebrates a culinary tradition loved by many. Each layer, from the base to the chocolate ganache, honors the dessert’s classic flavors.
When you make Nanaimo Bars, you share joy and tradition with others. It’s a chance to spread happiness and creativity. So, get ready to bake and enjoy making these beloved bars. Happy baking!