
Some recipes bring back memories of lazy afternoons and family gatherings. Maybe you learned to make an Oreo dessert from watching a parent. Or perhaps you want that comfort without using the oven. This easy Oreo dessert recipe offers familiar tastes—creamy, chocolatey, and perfect for groups—without much effort.
This no bake Oreo dessert has three layers: a buttery Oreo crust, a cream cheese layer with whipped topping, and a chocolate pudding middle. You can make it in a 9×13 or 9×9 pan. Chill it for a few hours or overnight. Then, it’s ready to impress at potlucks and holidays.
Table of Contents
Key Takeaways
- You can make dessert with Oreos without baking—perfect for busy days.
- This easy Oreo dessert recipe uses store-bought Oreos, cream cheese, Cool Whip, and instant pudding.
- Choose a 9×9 or 9×13 pan depending on how many people you serve.
- Chill time is essential: plan for at least 3–4 hours, preferably overnight.
- The recipe is highly versatile—double-stuffed or Golden Oreos change the flavor profile.
Why you’ll love this easy Oreo dessert recipe
This no bake Oreo dessert is quick to make and perfect for busy days. You can layer it in about 30 minutes. Then, just chill it while you do other things.
No-bake convenience for busy schedules
The recipe doesn’t need an oven, making it great for tight schedules. It’s easy to make with simple steps and few tools. This no bake Oreo dessert is a reliable choice when time is short.
Crowd-pleasing flavor and familiar ingredients
Oreo cookies, cream cheese, and pudding are flavors everyone loves. The mix of crunchy and creamy is a hit with both kids and adults. Using brands like Nabisco Oreo or Cool Whip ensures great results.
Make-ahead friendly for parties and potlucks
For a potluck or holiday, make it a day before. Chill for at least 3–4 hours or overnight. This way, the layers set and slices are clean. It stays fresh in the fridge for 3–5 days or can be frozen for up to two months.
Ingredients you’ll need for a classic layered Oreo dessert
Getting the right ingredients makes the recipe easy and reliable. Below, you’ll find amounts for both 9×9 and 9×13 pans. Plus, smart swaps if you need them.
Oreo cookies: types and substitutions
For a 9×13 pan, use a full 14–15 oz package of Oreos (about 35 cookies). For a 9×9 pan, 20–30 double-stuffed cookies make taller layers. If you need Oreo cookies substitutions, try Golden Oreos for a lighter flavor or Oreo Thins for a less sweet crust. All variants work for crusts, mix-ins, and toppings.
Key dairy components
One 8-oz block cream cheese softened pairs with a 16-oz tub of frozen whipped topping (Cool Whip) for a creamy middle. Use 2 3/4 to 3 cups milk or half-and-half when preparing pudding layers. If you want an Oreo dessert with cream cheese that stays light, beat the cream cheese until smooth before folding in the whipped topping.
Binders and flavor boosters
For a sturdy crust, melt 4 to 8 tbsp unsalted butter depending on pan size. One 5.9-oz instant chocolate pudding mix works for a modest 9×13 pudding layer; larger or richer recipes may call for two 3.9-oz packages. Add about 1 cup powdered sugar when mixing with an 8-oz cream cheese block to balance sweetness.
Tools and pan sizes
Choose a 9×9 glass pan for taller, sliceable bars or a 9×13 for thinner layers that serve more people. Use a food processor for fine crumbs or a zip-top bag plus a rolling pin for manual crushing. A spatula and a measuring cup come in handy to press crumbs evenly into the pan.
| Ingredient / Tool | 9×9 Quantity | 9×13 Quantity | Notes & Substitutions |
|---|---|---|---|
| Oreos (whole) | 20–30 double-stuffed | 14–15 oz package (~35 cookies) | Golden Oreos or Thins for Oreo cookies substitutions |
| Unsalted butter (melted) | 8 tbsp (1 stick) | 4 tbsp | Binds crust; adjust for desired firmness |
| Cream cheese | 1 (8-oz) block | 1 (8-oz) block | Soften to blend smoothly for an Oreo dessert with cream cheese |
| Frozen whipped topping (Cool Whip) | 1 tub (8–16 oz) | 1 tub (16 oz) | Substitute stabilized whipped cream if preferred |
| Instant chocolate pudding | 1–2 packages (3.9 oz each) | 1 (5.9 oz) or 2 small packages | Use instant chocolate pudding for quick no-bake layers; adjust milk amount |
| Milk / Half-and-half | 2 ¾–3 cups | 2 ¾ cups | Half-and-half yields richer texture |
| Powdered sugar | ½–1 cup | 1 cup | Sweetens and stabilizes the cream cheese layer |
| Tools | Food processor, spatula, measuring cup | Zip-top bag + rolling pin alternative, spatula, measuring cup | Food processor gives finer crumbs; measuring cup helps press crust |
Step-by-step assembly: building the perfect Oreo crust
Start by getting your workspace and pan ready. This makes building the crust quick and easy. A good crust means clean slices, a firm structure, and the right texture for your no bake Oreo dessert crust.
Decide how to crush your Oreos based on your tools and time. A food processor makes crumbs evenly. Or, use a zip-top bag and rolling pin for uniform pieces. This ensures a sturdy base for your Oreo dessert bars crust.
For a 9×9 pan, use about 20 Oreos. Add 4 tablespoons to 1 stick of melted butter for the right richness. Mix crumbs and butter until it holds when squeezed. Save one cup of crumbs for topping.
Press the crumb mix into the pan firmly. Use a dry measuring cup bottom to make even layers. This prevents a crumbly first slice and keeps the crust solid when cutting.
If the crust is too dry, add a teaspoon of melted butter at a time. If it’s too greasy, add more crushed Oreos. Aim for a texture that’s not oily or powdery. This balance is key for a reliable Oreo dessert crust.
Chill the crust for at least 10–15 minutes before adding layers. This helps the butter firm up and keeps crumbs in place. For the best results, chill longer if you can.
When it’s time to slice, run a sharp knife under hot water and wipe it dry. This makes cutting clean squares from your Oreo dessert bars crust easy.
| Pan Size | Oreos (approx.) | Melted Butter | Pack Tip |
|---|---|---|---|
| 9×9 | 20 | 4 tbsp (¼ cup) | Use a dry measuring cup to press firmly in even layers |
| 9×13 | 35–40 | 1 stick (8 tbsp) | Press from center outward for an even base |
| Mini pans or tart pans | 6–10 per mini pan | 1–2 tsp per mini crust | Press using the back of a small measuring spoon for control |
Creating the creamy middle: cream cheese and whipped topping layer
Start by softening your cream cheese. This makes it blend smoothly without any lumps. A silky cream cheese is key for a neat and professional-looking oreo dessert.
To soften it fast, leave it out for 30 minutes or microwave it for 20 seconds. Beat it until it’s smooth. Then, add powdered sugar to avoid any grainy spots. These steps help keep the filling smooth and stable.
Next, gently fold in Cool Whip or whipped topping. Use a spatula to scoop from the bottom, bringing air up slowly. This keeps the topping light and fluffy, without losing its volume.
For neat layers, dollop the filling on the crust and spread it out. Start from the center and move outwards with smooth strokes. Clean your spatula between each pass to avoid crumbs getting mixed in.
For extra stability, chill the cream cheese mixture for ten minutes before spreading. This makes the layer firmer and helps keep the pudding layer separate. These small steps can make a big difference in the texture and look of your oreo dessert.
| Step | Action | Why it matters |
|---|---|---|
| Soften cream cheese | Room temp 30 min or microwave 20s | Prevents lumps and reduces overmixing |
| Sift powdered sugar | Add while beating cream cheese | Ensures smooth, non-grainy texture |
| Fold in whipped topping | Use spatula, fold gently | Preserves air for a light no bake Oreo cheesecake layer |
| Spread and smooth | Work center to edges, clean spatula | Creates clean lines and prevents crumb streaks |
| Optional chill | 10 minutes before final smoothing | Firms the layer for neater assembly |
Making the pudding layer: texture and timing tips
Get the pudding stage right for neat, distinct layers. Use instant chocolate pudding for a quick no-bake layer. It sets firmly when mixed with cold liquid. Make sure to measure the milk or half-and-half exactly for the right consistency.
Using instant chocolate pudding for a quick no-bake layer
Choose instant (not cook-and-serve) pudding mix for a reliable oreo dessert pudding. Most recipes need two 3.9‑oz packages mixed with cold milk or half‑and‑half. Whisk until smooth, then let it sit until it thickens a bit.
How cold liquid and chilling help pudding set faster
Cold milk makes the pudding firm up faster. After whisking, chill the bowl briefly if it’s too runny. A short fridge rest helps it get to spreadable thickness without being too stiff.
Preventing the pudding from bleeding into the cream cheese layer
To stop pudding from bleeding into the cream cheese layer, wait until it’s fully thickened. If you spread it too soon, colors and moisture will mix and blur the layers. You can also chill the cream cheese layer briefly to stabilize it first.
By following these timing and temperature steps, your instant chocolate pudding layer will stay clean and glossy. This makes the oreo dessert pudding look and taste professional.
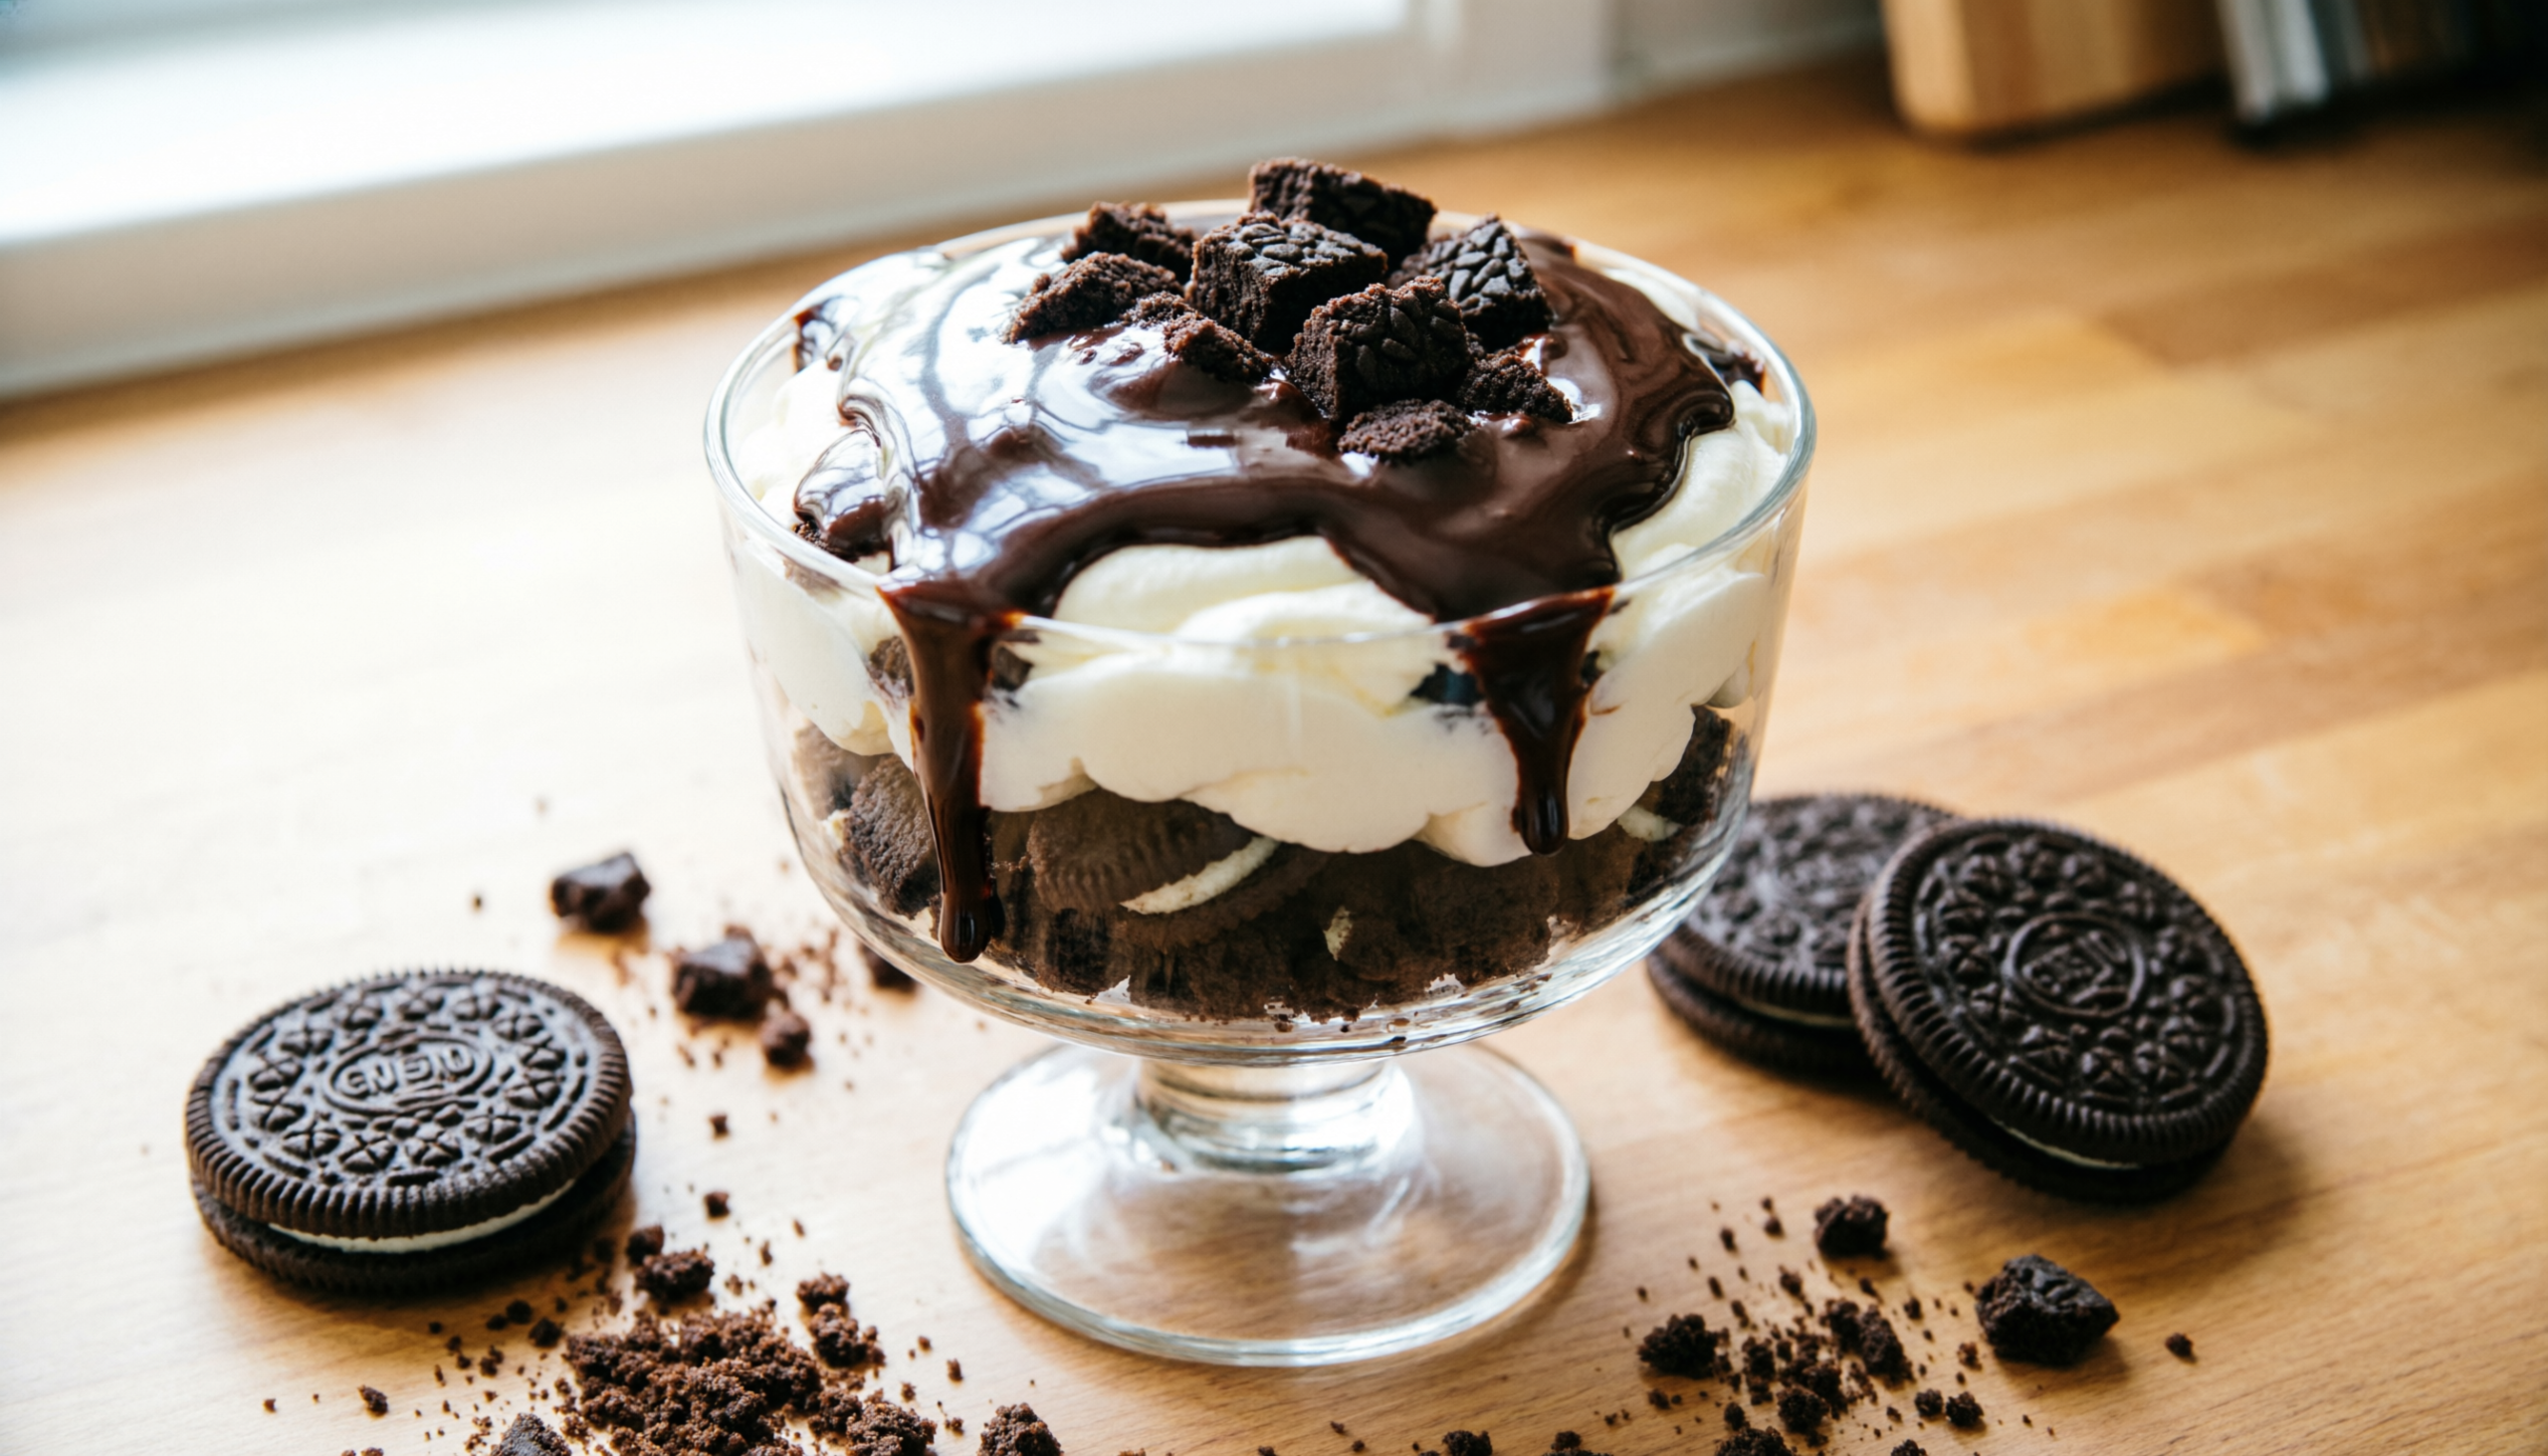
Finishing touches: topping ideas and presentation tips
Add a few simple touches to make your dessert pop. Think about texture, contrast, and a focal point. These small changes can make a big difference in how your Oreo dessert looks and tastes.
Crushed crumbs and chunky accents
Save 2–3 finely crushed Oreos for a light dusting. Break 8 cookies into bigger chunks for a crunchy top. Place whole Oreos along the edge for a classic look.
Drizzles, shavings, and sauces
Warm hot fudge or caramel in a squeeze bottle for a neat drizzle. Chocolate shavings add elegance. These toppings enhance your Oreo dessert and pair well with whipped cream.
Themed twists and mix-ins
Use peppermint pieces for a holiday twist or add chopped Reese’s and Heath bar crumbs. Try a peanut butter or vanilla pudding layer for contrast. These ideas are easy and change the dessert’s mood.
Styling for serving
Chill the dessert before slicing for clean layers. Use a hot, dry knife for the best cuts. Label plates and stack small portions on dessert forks for a buffet.
Party-ready alternatives
For a crowd, make individual jars or a trifle bowl. Layer crumbs, cream, pudding, and toppings for a stunning dessert. Personal jars make serving easy and show off the layers.
Storage, make-ahead, and serving suggestions
Plan ahead for that perfect no-bake Oreo dessert. A short chill helps layers set and flavors blend. This recipe is great for parties, potlucks, or weeknight treats, saving you time and stress.
Chill time recommendations
Chill for at least 3–4 hours for firm pudding and cream cheese layers. For the best texture, make it a day before and refrigerate overnight. This way, the crust stays together better.
Fridge life and freezing guidance
Keep your dessert tightly covered in the fridge for 3–5 days. For longer storage, freeze Oreo dessert pieces up to 2 months. Thaw them in the fridge overnight for the best texture.
Slicing and serving tips
Refrigerate fully before cutting for clean portions. Use a sharp knife warmed under hot water, then wipe it dry between cuts. Press the crust firmly during assembly to avoid crumbling. Serve chilled for the creamiest bite.
Quick reference storage table
| Storage Method | Duration | Notes |
|---|---|---|
| Refrigerator (covered) | 3–5 days | Keep tightly sealed to prevent odor transfer and drying |
| Make-ahead (refrigerated overnight) | Ready in 8–24 hours | Best for clean slices and optimal flavor melding |
| Freeze Oreo dessert (individual pieces) | Up to 2 months | Wrap pieces in plastic, then foil; thaw overnight in fridge |
| Serve after thawing | Consume within 24 hours | Thaw in refrigerator for best texture, avoid microwave thawing |
Easy variations and other oreo dessert ideas
You can make many quick treats from the basic recipe. Try different layers, textures, or make single-serve bites. This way, you can match your dessert to any event or schedule.
No-bake cheesecake and truffle bites
A no-bake Oreo cheesecake uses the same crust. Mix cream cheese with whipped topping, press into a pan, and chill. For easy bites, roll the filling with crushed cookies into Oreo balls truffles. Both are quick to make and perfect for parties.
Frozen and layered crowd-pleasers
Make an Oreo ice cream cake or trifle by layering cookie crumbs, ice cream, and whipped cream. For a clean-cut sheet dessert, build Oreo bars in a 9×13 pan and chill until firm.
Flavor swaps and dietary tweaks
Change the flavor by using vanilla or peanut butter pudding instead of chocolate. Golden Oreos offer a lighter look and taste. For vegan options, use dairy-free cream cheese and plant-based whipped topping. You can even make an Oreo dessert lasagna for potlucks by layering cookie crumbs and creamy fillings.
oreo dessert: troubleshooting common issues and expert tips
Small problems can ruin a no-bake Oreo dessert. This quick guide helps you fix common issues. It covers texture fixes, mixing tips, and pan size adjustments. Your dessert will look and taste great.
Fixing a runny layer or under-set pudding
If your pudding is too runny, chill it in the fridge for 30–60 minutes. Use cold milk or half-and-half for better setting. For a quick fix, freeze it briefly but watch it to avoid ice.
How to avoid lumps in the cream cheese layer
Make sure cream cheese is at room temperature before mixing. Cold cream cheese can cause lumps. Beat it on medium until smooth, then mix in powdered sugar and Cool Whip gently.
Pan size adjustments and ingredient swaps
A 9×9 pan makes taller layers, while a 9×13 pan makes them flatter. For smaller pans, use less ingredients to avoid overflow. Try half-and-half for richer pudding and full-fat cream cheese for a better texture. Golden Oreos can change the flavor without affecting the texture.
- To fix runny pudding: chill longer, use cold liquid when mixing, or brief freeze.
- To prevent lumps in cream cheese: soften, cube, beat smooth, then fold gently.
- For pan size adjustments: scale ingredients down for smaller pans; expect layer height to change with pan dimensions.
These steps help fix Oreo dessert problems and ensure a reliable treat. Test each change separately to see what works best.
Conclusion
You’ve learned how to make a classic no bake oreo dessert. It starts with a buttery Oreo crust. Then, you add a fluffy cream cheese and whipped topping layer. Finish it off with instant chocolate pudding and cookie crumbs.
This recipe is easy because it uses store-bought ingredients. You’ll get impressive results without complicated steps. Make sure to use softened full-fat cream cheese and thawed whipped topping for the best texture.
The no bake oreo dessert is perfect for busy days and gatherings. It’s make-ahead friendly and forgiving. Press the crust firmly and let the pudding thicken before spreading.
Chill it for at least 3–4 hours or overnight for clean slices. This helps prevent a runny layer and keeps the cream cheese filling smooth.
If you’re looking for more ideas, try no-bake Oreo cheesecake, truffles, or an Oreo ice cream cake. Store finished bars in the fridge for 3–5 days or freeze for up to two months. Thaw overnight in the refrigerator before serving.
With a few pantry staples and these tips, your next dessert will be easy, nostalgic, and loved by all.